Friday, February 24, 2012

House Tour: Guest Bathroom -- Before

Oh...and this is where the house tour comes to a screeching pause. 


Okay, thank you. That break is brought to you by a little thing I like to call: The Guest Bathroom. 

You know that point in home renovation when you've had it? Maybe you've been renovating a house for a year or so and half of your belongings are in boxes, the other half staged in an on-the-market home, and an entire other half that shouldn't even exist is crammed into storage. And maybe the house you've been renovating is about 85-90% complete (save lots of little details and one last bathroom that is really only for guests anyway). Maybe you throw your hands up in the air and call it good enough, move in, and swear that last bathroom will be finished as soon as we settle in. 

Or is that just me? 

Yes, well it is definitely me, us, our sad little guest bathroom. In the interest of total disclosure, I present our guest bathroom. To our credit, we have almost everything we need to turn it into an "after" -- except time. 

Here is the original design concept:

We're mostly sticking with this concept, except that we used these light fixtures in our master bathroom so we are using a different one here. And we used the pebbles on our master bath shower so we might take that a new direction too. The walls will be a bamboo green. Kind of a natural, spa feel...hopefully.

In the meantime, here are the before pictures: 


And here is the bathroom today (who would have guessed the stripes were the second choice for wallpaper):


Still to-do
EVERYTHING.

House Tour: Guest Bedroom -- Before & After

Hmm...what to say about an extra bedroom. I think the best thing to say is that I'm grateful to have one! We tend to have a few overnight guests here and there. Grandmas, friends, wayward travelers...you know the deal. Anyhow, in our last house we gave up the extra bedroom in our downsizing efforts and instead had a dedicated office. I missed that spare room alot. I bet our guests missed it even more because where did they sleep? Yep, that dedicated office. For awhile I had a daybed in the study and it worked okay, I guess. But, not ideal. So, gaining back the guest bedroom was wonderful. Even if it is nowhere near guest ready. Why is that? Because I've decided it works much better as a room to collect all of the stuff that I'm not ready to hang on the walls yet. It's like one big decorating closet. But, I'm working on that (maybe I'll explain more later). 

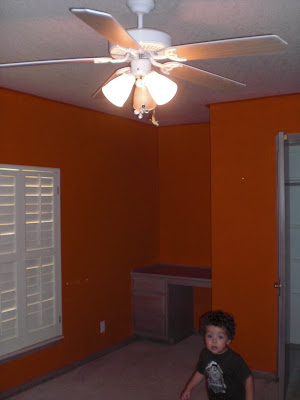
This room was another simple redo. (Easy for me to say since my role in the whole shebang is to pick finishes and paint colors.) There was a very cute sports-themed mural gracing the walls which led Mr. Riley to believe this was his future room for a long, long time. Poor guy. It was not his future room and the fun mural is no more. Sorry, sports fans. The color we chose ended up maybe being my favorite in the entire house and I'm actually thinking about using it in our master bathroom. We will see...
The details:
Walls: Sherwin Williams Fawn Brindle
Trim: Sherwin Williams Dover White
Ceiling Fan: Lowes


*BEFORE*


See, he really loved it. Mean mom, I am.


*AFTER*

Please overlook the weird sun glare on the wall. Oh, and the not-yet-replaced electrical outlets.

Wednesday, February 22, 2012

House Tour: Master Bathroom -- Before & After

And what comes after a master bedroom...why, a master bathroom! Can we just take a moment to soak in these before pictures, please? Man...the wallpaper. It is crazy to even look at these before shots and remember it. This is like a bad dream set in the 90s: whitewashed woodwork, sassy brass, CARPET (gag me). The askew blinds just make a bad thing even harder to take. I'm not even sure I got a picture of the disgusting mess that was the shower--complete with never-cleaned surround and who knows how many years of hair, dirt, grime, and gross. EW. 

An overhaul was in order here...and we gave it the 1-2. Kapow! I don't have great afters of this because honestly, this room is still very much in progress. I have lots and lots of tweaking to do (some husband involved) to make it right. And, I hate how light the paint color is so I plan on repainting it very, very soon to warm it up some. All of that to say, the afters are peeks into what will soon be.

The big things: we kept the vanities, but painted out the cabinets black, ditched the disgusting carpet and did stained concrete, granite on the counter-tops, new mirrors, vanity lights, new toilet (this goes without saying in every bathroom, but I'll say it anyway), new faucets. The biggest change came with the shower. Kevin wanted a new manly shower--one that could easily accommodate his oversized body. He ripped out the existing grossness and built an enormous cave of a shower that really changed the room. His talent astounds... Some cool tile gives this room the most modern vibe of the entire house.

The details:
Walls: Sherwin Williams Modern Gray (for now)
Trim: Sherwin Williams Dover White
Vanity Cabinets: Sherwin Williams Tricorn Black
Light Fixures and Faucets: Overstock
Shower fixtures: Kitchen Source 
Bathtub fixtures: Ebay
Concrete floors: Advance Concrete Design
Shower tile: Northwest Builders Supply
Granite countertops: Northwest Builders Supply (name of granite to come)
Mirrors: Overstock
Toilet: Home Depot


*BEFORE*


Again, I like to include the pregnant shots...


*AFTER*


These floors were SO dirty when I took this picture. The floors really don't look like a just-used chalkboard.

Still to-do
Repaint 
Add another coat of sealant to concrete floors
Panel the front of the tub
Window treatments
Caulk and grout around shower 
Towel holders/bars
Finish replacing electrical outlets
New windows (faux glass blocks = not my thing)


 And cannot forget the reason I fell in love with this house, the master closet:

*BEFORE*

*AFTER*

House Tour: Master Bedroom -- Before & After

Introducing...the largest bedroom I've ever lived in! I'm not complaining--it's a gorgeous space--but, man-o-man, it is a BIG room (it even has surround sound, hello!) and before we renovated, it was a little yuck (like everything else here). Same pickled woodwork, boring walls, brass finishes. Nothing remarkably gross in here, just lots in need of sprucing, I guess.

Two houses ago (sad that I can say that and not be talking about every house we've lived in), I painted our Master Bedroom a blue/gray color that was perfection. So, why mess with perfection, right? I used it again. I really, really wanted to do a chandelier in here (just like I really wanted to in the office) until I thought about two of my least favorite things in Oklahoma: July and August (despite the fact that they are our birthday months, which redeems them slightly). Anyhow, I couldn't get past the feeling of waking up hot in the middle of the night and a ceiling fan became the clear victor in the beauty/practicality battle. Maybe in the future, I can come to grips with my weirdness and put pretty things above wind creation.

To recap: This room was an easy one. Paint, carpet, ceiling fan. We kept the existing marble surround on the fireplace for now (it works) and painted out the brass on the surround a matte black (heatproof). That's about it. I'm still deciding just how this space is supposed to work, but in the meantime it is nice to stretch out a little. 

The details:
Walls: Valspar Autumn Fog (color-matched to Sherwin Williams)
Trim and Woodwork: Sherwin Williams Dover White
Ceiling Fan: Lowes
Marble on fireplace: Existing (can't say that many times on this remodel!)


 *BEFORE*


*AFTER*

Flip-flops not part of the design plan.

This is a very overblown flash--not really this blue at all.

Still to-do
Window/door coverings

Friday, February 17, 2012

House Tour: Boys' Bathroom -- Before & After

At this rate, the world will end before I finish this house tour. Can I give up procrastination for lent? Argh.

So, I will say as I dive into this next spot that I LOVE this room. I know, I say that alot. Do I? I feel  like I do. This is the boys shared bathroom and a dream come true when it comes to hiding kid stuff. I love that this room is away from guests and traffic and it can be a full-on, child friendly zone.

Our vibe was retro modern, I guess. I wanted to go shiny chrome, lots of curvy, vintage-esque fixtures, and penny tile--definitely penny tile. A trendy pick, to be sure, but I can't help my love of the little round coins. They are adorable. We originally were going to do a different color, but when we stumbled upon 2 random boxes of light green tile in the clearance aisle at the Depot (an internet return), we were sold. There wasn't quite enough tile to cover the floor so after a little bit of a treasure hunt, I found the exact same tile on Overstock.com. (This house is truly the home that Overstock built.)

Classic subway was a carry over from the kitchen (which will be shown here soon!), but here we kept it simple (read: cheap) and went for the super duper basic subway that is always in stock at the HD. (Okay, the house that Overstock and Home Depot built.) And the granite was a remnant choice that would have cost double what we paid if we picked it out from a full slab. Except for the kitchen, we used remnant pieces in the entire house and have granite pretty much everywhere.

The paint is the same as in the living room and very simple. I wanted the room to feel classic so that we could change around accessories as the boys get older without being too tied into a theme. Oh, and we saved the existing, very nice bathtub and had it professionally re-glazed. A great option if the tub just needs a little facelift.

You can't really see the vanity light below, but here it is in the original design board I created:
 And as you can see from this, we made some changes along the way, but pretty much stuck to initial vision. It is a pretty swanky bathroom for two little boys, I must say.


The details:
Walls: Sherwin Williams Modern Gray
Trim and Woodwork: Sherwin Williams Dover White
Light Fixure and Faucet: Overstock
Shower fixtures: Kitchen Source (I think?)
Subway tile: Home Depot (in store, in-stock)
Penny tile: special order Home Depot/Overstock

*BEFORE*
Sometimes I look at these pictures (that's pregnant me, by the way) and am scared that I let Riley touch anything.


*AFTER*


Still to-do
Mirror...to paint or not to paint? I like it bamboo, but...
Shower curtain rod--still. It's all baths, all the time up in here!
Cabinet hardware. Anthropologie is calling my name!

Monday, February 6, 2012

House Tour: Kid Rooms -- Before & After

How's that for anticipation? I had to take a slight break in blogging so we could head off to Florida for a much-needed break from reality at the most magical place on Earth. Unfortunately, reality stowed away in our oversized suitcase and presented itself in the form of a sick kiddo. Sigh... More on that trip and our gratefulness for resort laundry facilities in another post. For now, I'm going to continue this extremely lagging home-tour.

Today's peek isn't the most exciting, but I have to cover it all. These are the boys' bedrooms. I'm combining them, because I'm sure it could bore you to tears to see them in separate posts.

These two rooms were kind of...disgusting. Yep, that's a good word. I don't even want to speculate what may or may not have happened in them, but I never would have dreamed they would turn out so fresh and so clean, clean. Ridiculous paint, the grossest carpet ever, and dated fixtures--blech. Again, I wish you could smell through your screen because these pictures don't quite convey what I'm talking about.

To redo these bedrooms, we kept it simple. Fresh paint, new carpet, new fixtures, we refinished the plantation shutters and added white wooden blinds where there were none. The closets got bright lights, fresh paint, and filled to the brim. Now, two spaces for brothers to play -- minus the yuck. I think kid rooms are a place to have a little fun with color and get a little crazy. So, this is my version of crazy. I can't wait to show you these decorated. Much cuter!

(As always, click on the pictures to see them nice and big in a lightbox.)

ROOM #1 -- The details:
Walls: Sherwin Williams Lime Rickey
Trim and Woodwork: Sherwin Williams Dover White
Ceiling Fans: Lowes

*BEFORE*

I forgot to mention the murals! 

Riley looks so little here!

*AFTER*
Excuse the TV--had to occupy children during renovations. :-)


ROOM #2 -- The details:
Walls: Sherwin Williams Bee's Wax
Trim and Woodwork: Sherwin Williams Dover White
Ceiling Fans: Lowes

*BEFORE*


*AFTER*


Still to-do
New windows
Up next...another bathroom!