Falling off the blogging wagon...my special gift is falling off the
blogging wagon. (Anyone know what movie I stole that from? Well, not the
blogging part, but the rest.)
Another month is gone,
and the home tour is coming to a long, drawn-out end. Today, is the last
room I have for you. (At least until we add-on, right?!) I present,
our kitchen.


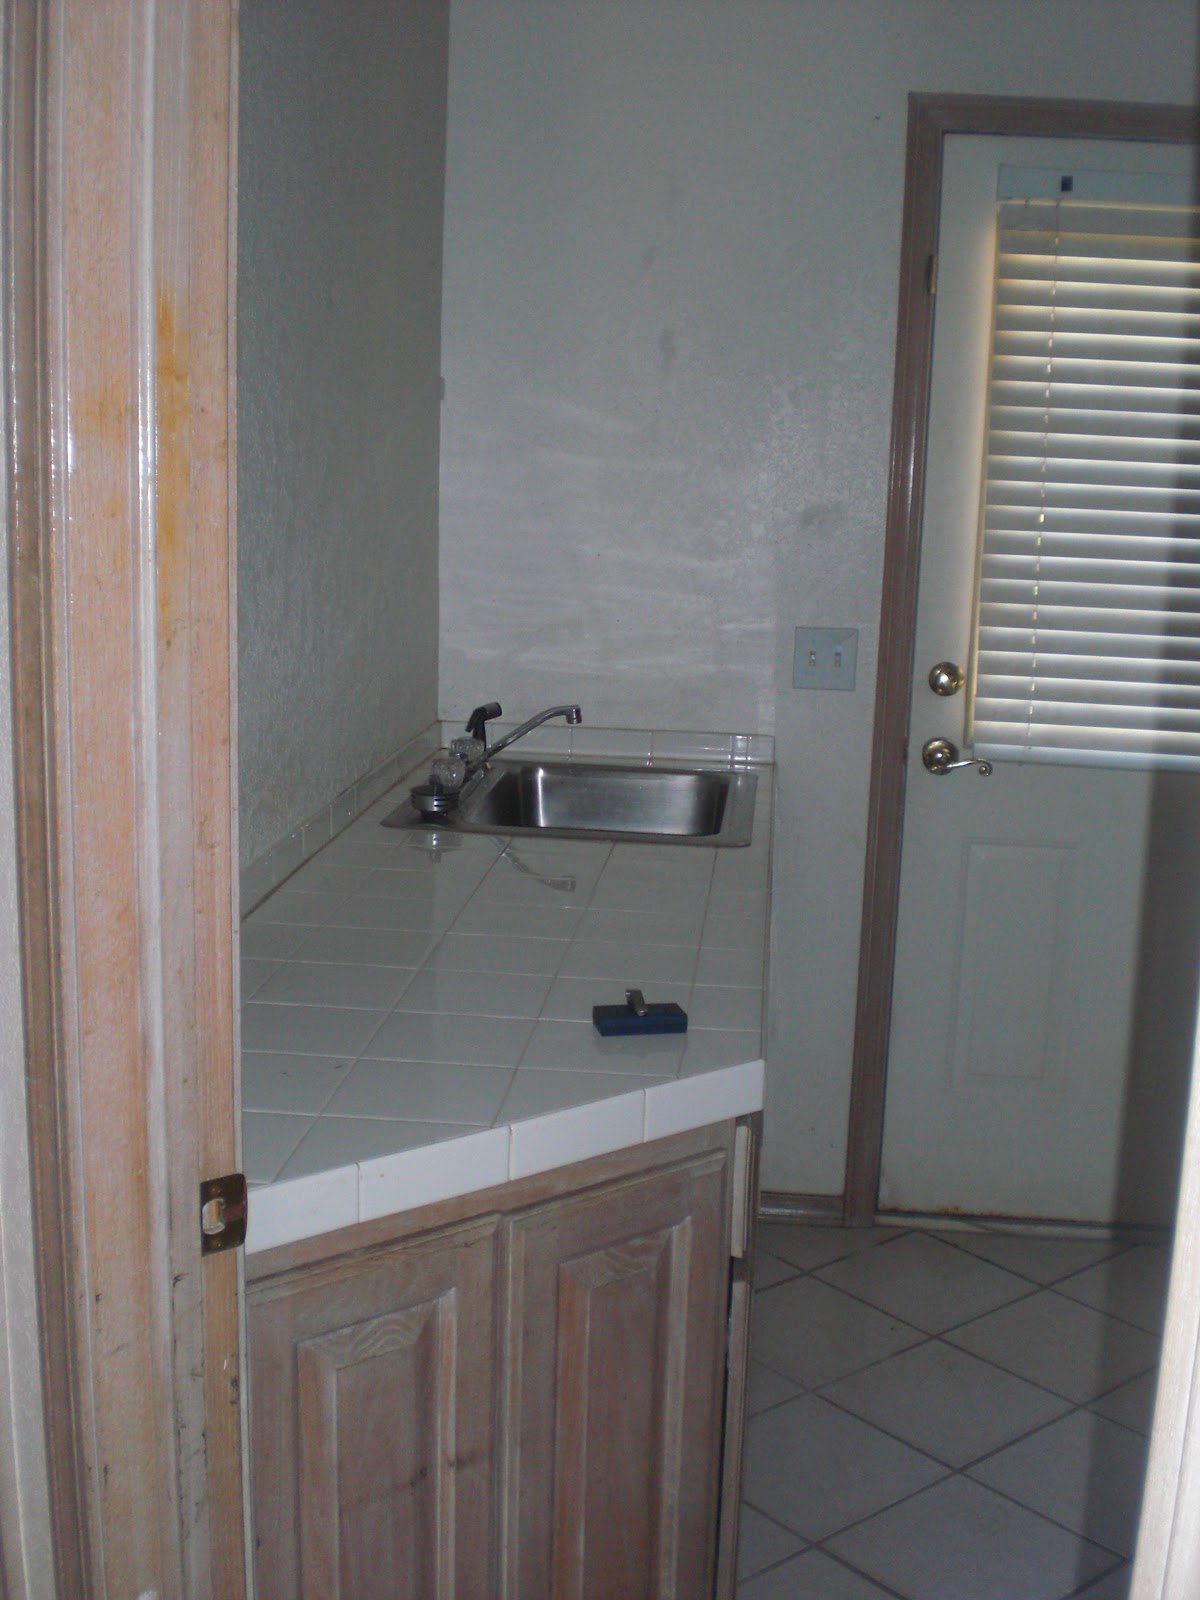
This kitchen was kind of gross. I
don't really know another word for it. From far away it doesn't look as
dirty as it actually was. Imagine a coating of grease on every available
surface. Our plan here was simple--rip it all out. But, we didn't do
that. We are not ones to rip out a cabinet unless we really, really have
to. So we changed the plan. (Okay, that was never the plan.)
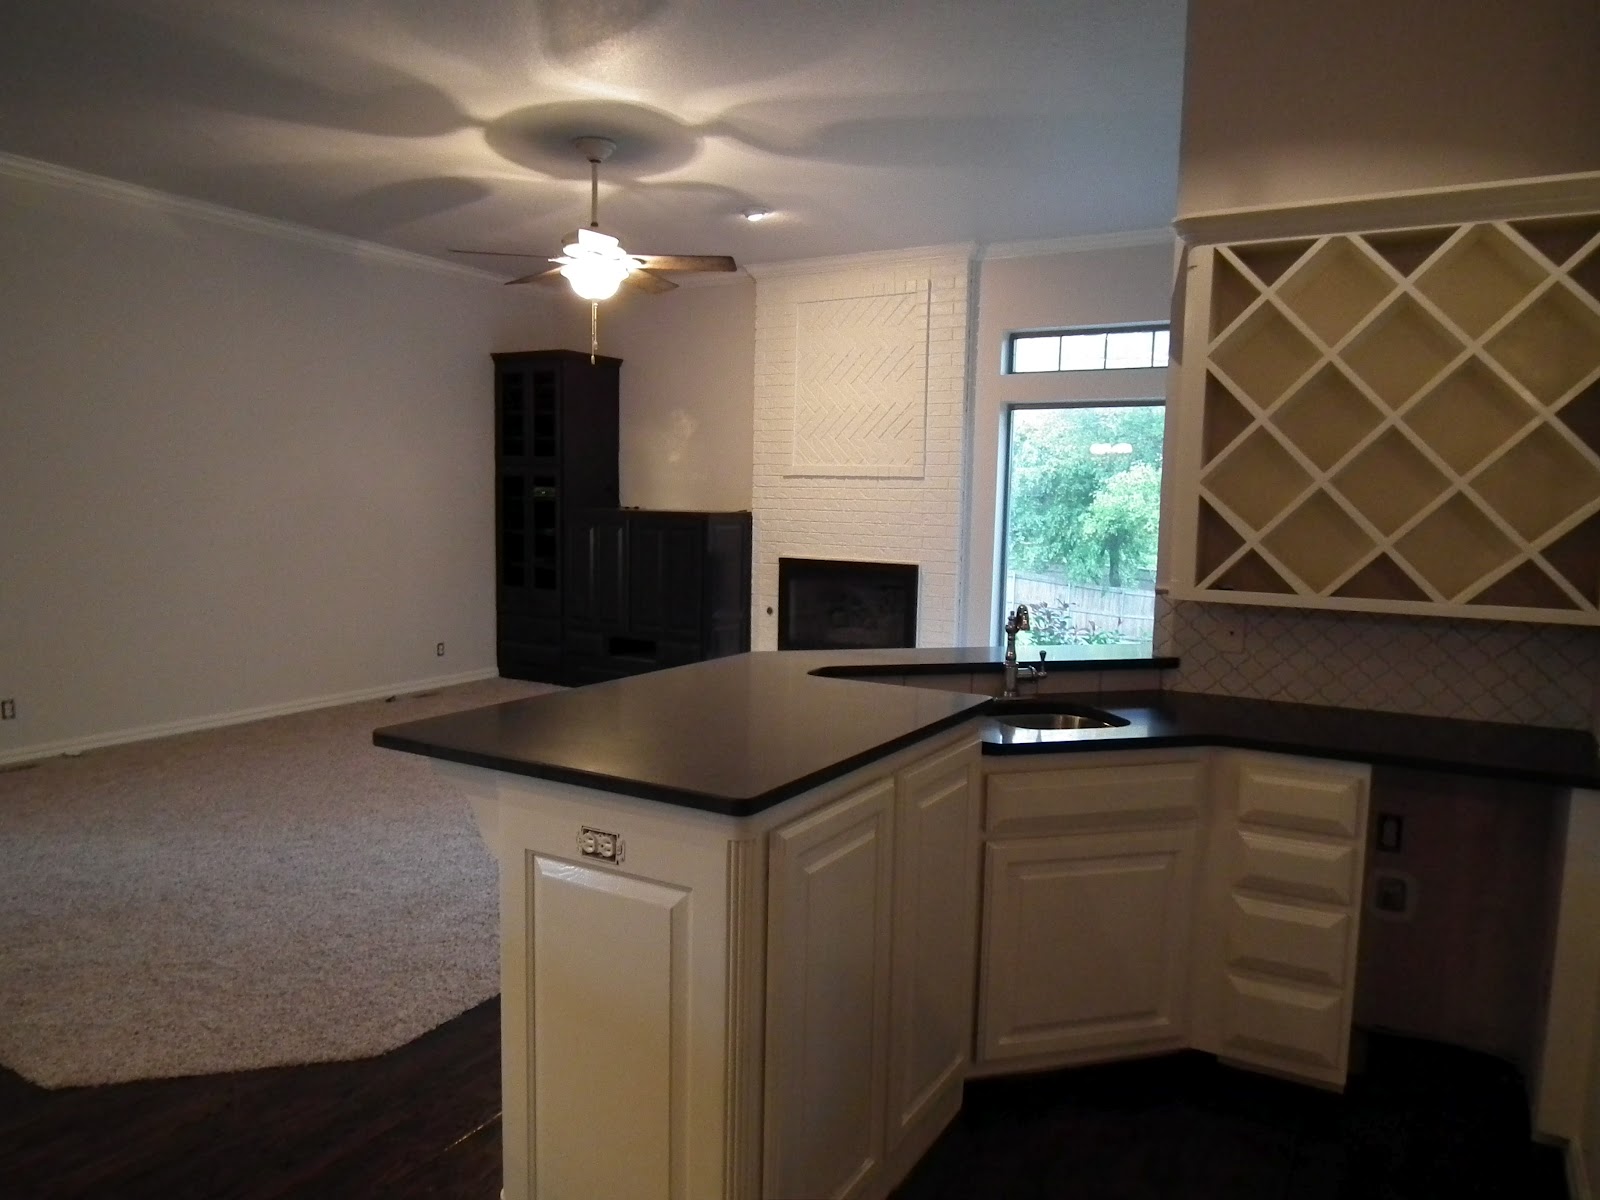
First
some rearranging. The biggest was the cooking area. We called a plumber
and had a gas line installed against the wall where the glass-front
cabinets were. We removed those cabinets and decided this was the best
place for a new gas cooktop and hood. The existing electric cooktop went
the way of the floppy disk and I knew from the start I wanted a butcher
block top.
Circa-1994 flourscent lights got the
heave-ho (along with the big wooden box that housed them) and we brought
in a crystal chandelier and can lights around the perimeter. (Very easy
to add if you aren't the one doing it.)
The falling
apart (and never cleaned) black appliances were replaced with stainless
steel Bosch appliances that I purchased off of eBay to save hundreds of
dollars.
I had my eyes on a so-big-you-can-bathe-in-it
farm sink, but decided to go stainless with it to give my traditional
nature a little modern kick (for Kevin). We also added a fantastic
commercial style sprayer faucet that has been really practical.
The
color is kind of hard to read online, but it is a dark gray. I only
tried about 150 shades of gray (not the book title p.s.) before I picked
this one.
Oh, and the backsplash. It is a subway tile,
but a little longer and shorter than normal subway. I think a 2 x 6". We
ordered it online and I love that it is traditional, but different. And
the backsplash over the cooktop is a specialty tile that is a knock-off
of some super expensive (and crazy gorgeous) Walker Zanger tile:

We did the white version from Overstock.com. Same idea...on a budget.

And
the granite. I used to have dreams at night about honed black granite.
Honed = not shiny. I actually had dreams about antiqued or leathered
black granite, but I knew from the some visits to the stone yard, that
those would remain just that--dreams. But, honed black granite, although
a definite splurge (the biggest in our kitchen), wasn't exactly out of
the question. We looked at dozens of black granites, almost black
granites, and even white granites to decide where we wanted this kitchen
to go. And we kept leaning towards Absolute Black honed. If you do a
google search on this topic, you'll hear about what a horrible idea this
is. It is compared to a chalkboard, called a cleaning nightmare, and
about every other bad name in the book. But, we couldn't help it. We
wanted it. We loved it. We finally bit the bullet and decided on the
much-bad-mouthed granite.
And the verdict? We love it.
It is definitely not for the lazy. There is frequent wiping and smudges
will not be camouflaged in the way many granites so nicely can. But, it
is so, so pretty. And exactly the look we were going for. In the end,
decide what you love and do it. Everyone else can pick their own
granite.
The details:
Walls: Sherwin Williams City Loft
Trim and island: Sherwin Williams Dover White
Cabinets: Sherwin Williams matched to Benjamin Moore Amherst Gray
Granite: Absolute Black, honed; Northwest Building Supply
Chandelier: Overstock
Appliances: eBay
Sink: eBay
Faucet: Overstock
Backsplash: Home Depot/Overstock
Butcher Block: KitchenSource.com
*BEFORE*
 |
| 1994 called ( on the wall phone) and they want their white-washed cabinets back! |


 |
| Notice the outline of the previous mat--and the grease-coated drawer. |


 |
| Just a tad bit dirty. |
 |
| Oh my wallpaper. |

And some mid-remodel excitement:

 |
| Picking cabinet colors. |

*AFTER*
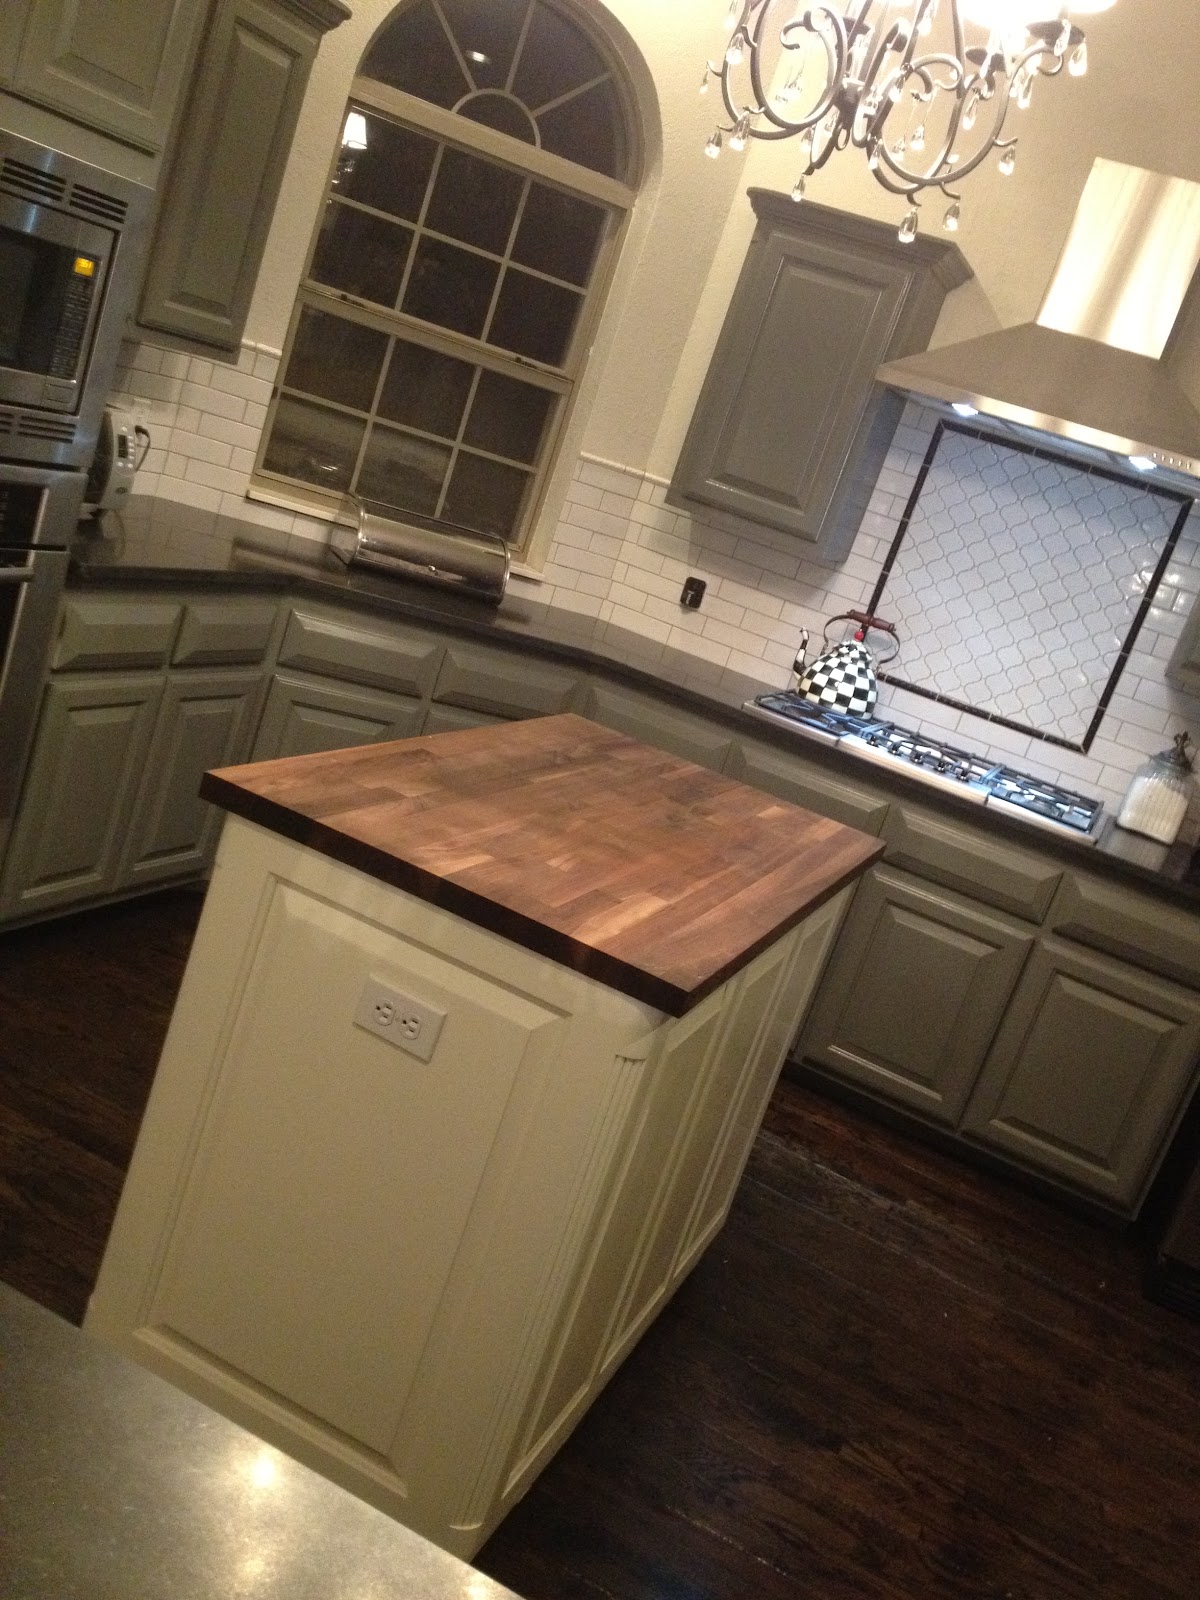 |
| The John Boos butcher block walnut island. |

 |
| Bosch appliances (microwave/oven/convection over and dishwasher) all purchased on eBay! |


|
| Backsplash might be my very favorite. We used a longer subway and the Moroccan-inspired backsplash. |
 |
| Overview of the kitchen, before the chandelier, but without the florescent light box. Still need to raise hood and install butcher block. You can see here how we added a bigger counter overhang to accommodate barstools. |
 |
| Some things missing here, but a good overall shot of the space. |
And
like everything else in our home, nothing is all-the-way "after" yet.
There are still a few final things to do in this kitchen. I still need
some really good after shots once we make it to that point. Overall
though, the biggest change in our house. Ridiculously different.
And one more before/after comparison:
Still to-do:
Extend range hood to ceiling and create crown molding surround
Hardware: pick out and install
Install pot-filler on backsplash behind cooktop (it is sitting in the box, waiting on us)
Window treatment